We may earn money or products from the companies mentioned in this post.
Ok, last year I made this little number and we had so much fun with it throughout the year, I felt compelled to share it here!!
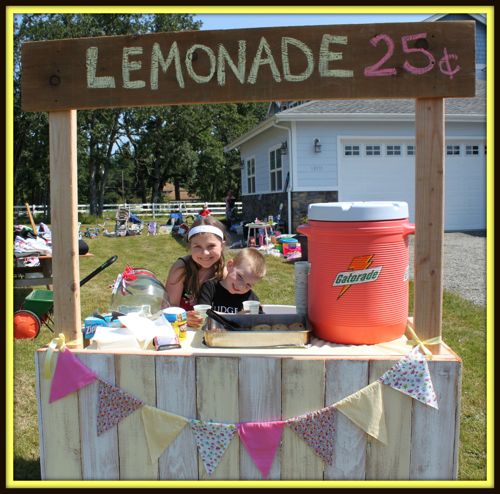
Originally, I built it for my daughter to sell lemonade and cookies at a garage sale. She raises money every year for Children’s Hospital and this was the ticket! It turned into more fun than I imagined!
For once, I thought ahead and used chalk on the “header board” instead of paint! That way we could change it to whatever we were dreaming up that day! Spray it with a water hose and you’re ready to go! Uhmmm…let’s see…it’s been the lemonade stand, a car wash, a latte stand, a dog wash, a movie booth, puppet show, a TV and a concert show! We got our use out of this little guy last year and I see this Summer being filled with even more imagination and fun!!
I’m not the most savvy when it comes to building, so if I can do this, I promise you can! If this tells you anything…I couldnt’ get ahold of my husband, so I called my dad to see how to get the safety off on the chop saw! After the fact, my husband thought that was a clear sign that maybe I shouldn’t have been using it! Ha! Since all went well, I’ve used it many times since!
Ready to make your own?? You’ll be #1 Top Rockin’ Mom to your kids and their friends!! Come on, we all need that reminder every once in awhile!
I bought all my supplies at Home Depot, but I’m sure any little handy dandy lumber shop would have what ya need!
(4) 2X4’s 12′-0
(10) 6′-0 Cedar planks
I had the chop saw, screw driver, screws, hammer and nails at home already!
All said and done, $38.00, Not too shabby!!
Now let’s get started!!
First, I cut all my cedar pieces down to 29 1/2″. This was for the front and the sides. (10 for the front & 5 for the sides)
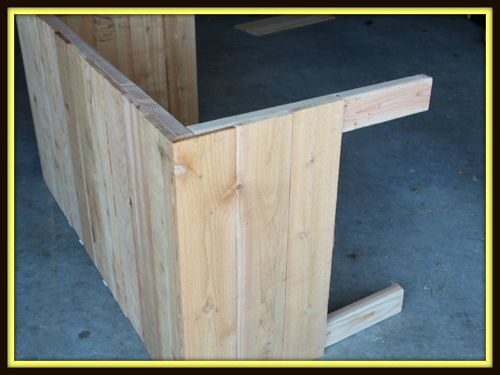
Second, I cut the 2 x 4’s down to make the frame.
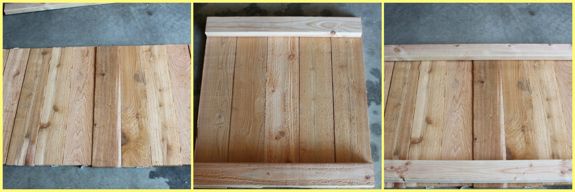
I used long screws to put the frame together and used small nails to apply the cedar to it.

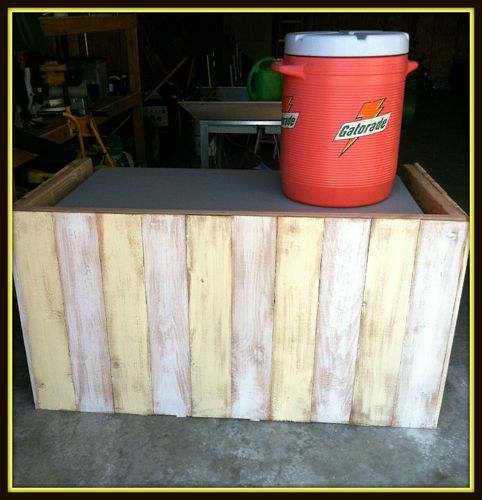
I used the paint I had left over (7 years ago!) when we painted Kiley’s baby room!
Instead of making more work for myself, I slipped a 4′-0 table in that we already had!
I Picked up some cute fabric at Joann’s {using my 40% coupons!}
1/2 yard of each {3 patterns}
2 yards of one for the table cover
This was to make a cute little bunting to go across the front!
Total spent: $17.00
{I used the fabric for this, but also had plenty left over for my fabric scrapbooks!}

My husband did have to help me add the top part (2X4’s screwed to the frame and a large peice of cedar), but other than that it was all me!! Total spent for the entire project was $55.00! Best money spent!
Seriously, this will keep the kiddo’s busy using their imagination all day long!!
ENJOY!!
Kristy
Inspiration for this project came from Lil’ Luna.
I am pleased to have Kristy contributing here at Thrifty and Thriving. Kristy is a Pinterest junkie, she loves crafting and anything DIY. You can view more of her fun projects over at Cup of Jo!


Love, love, love this! Gonna try to put one together for my younger kiddos this year – what a great idea. Thanks for sharing it 🙂
Your stand looks AWESOME!! Seriously – you did a great job! Thanks for the link back, and I hope you have a great day. 🙂
Target often has cute lemonade stand accessories in the dollar spot that would look great! I wish I had a cute lemonade stand, lol!