We may earn money or products from the companies mentioned in this post.
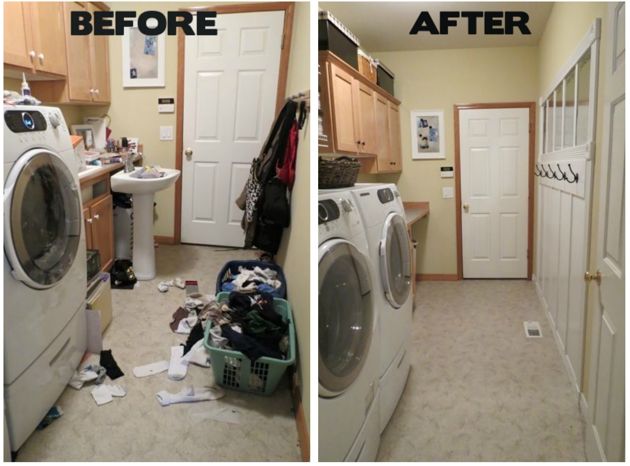
Here are the before and after shots of my laundry room! It feels so good to have it clean and organized. It’s hard to get one shot that really shows the entire room, so here are a few more photos of the finished room (ignore the fact we are missing a board by the sink – long story!)
I am going to give you a rundown of the problem areas and some close-ups of what I did to fix those areas. In most cases I used items I had around the house for storage. I did head to the thrift store to find a couple of items I didn’t have at home.

Our laundry room looks messy on a regular basis. If there is ever a surprise knock at the door, the first thing I usually do is yell at my kids to close the laundry room door before they open the front door. I don’t want other people to see the chaos in our laundry room!
You can see the messy laundry room whenever you are standing in the kitchen and it’s just plain annoying. I decided I needed to clean up this problem area in our house for good.
Truth be told, this is actually a cleaner version of what the room usually looks like, I just happen to snap the “before” photo on a semi-good day. We don’t normally have a bathroom sink in there either, we are in the middle of a bathroom remodel, which pretty much proves my point that everything ends up in the laundry room. I need this room to be more than just a place to do laundry. Here are the things I wanted to accomplish in the laundry room:
- Make a clean and organized area to do laundry
- Provide a place to store all my craft supplies
- Have an organization hub for our family
Laundry Room
The laundry room becomes such a mess for several reasons, here are the problem areas I want to tackle:
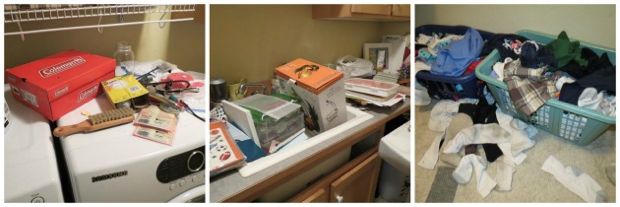
Top of Washer & Dryer – The top of our washer and dryer are pretty much always a mess. We all put things on top of the dryer that need to go back out to the garage. Plus, I have all the laundry supplies on top of the washing machine, because I’m just too lazy to bend over and put it back into the bottom drawer . When you end up doing several loads a day it can be quite the workout! Who wants that?
Counter and Sink – Oh my goodness, we pile stuff here too…LOTS OF STUFF! Anything that doesn’t have a place and needs to go back to the garage ends up getting thrown in the laundry room. You probably can’t even tell that we have a sink there, but we do!
Finished Laundry – Confession time! I am kind of lame when it comes to laundry. I don’t mind washing it, but when it comes to folding and putting away, it doesn’t always happen right away. So, we usually throw clean clothes in laundry baskets and then the kids have to go fishing around for a pair of socks. As you can tell clothes end up being thrown on the floor in the process. Not the best system!
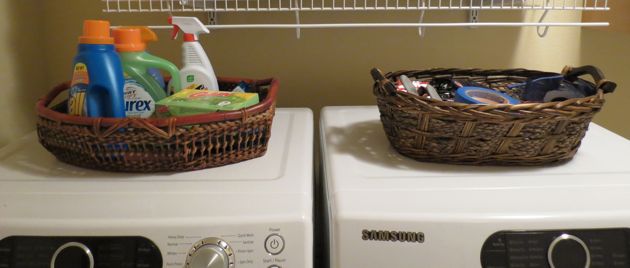
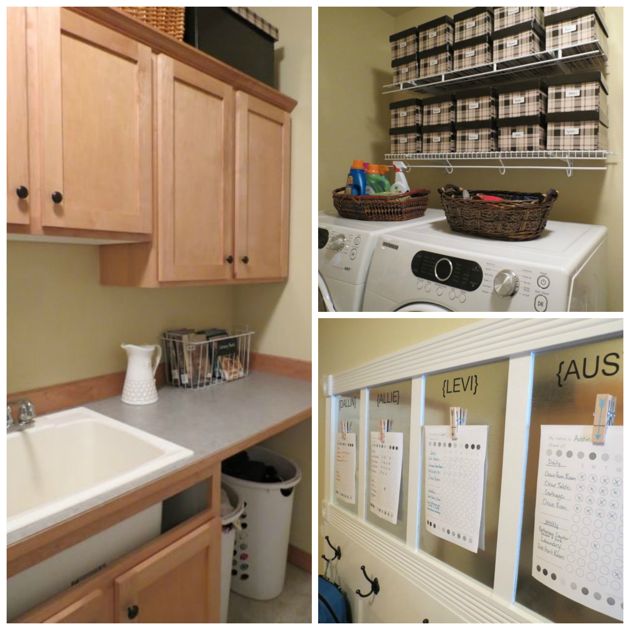
To control the clutter on top of the washer and dryer I used two large baskets that we received at Christmas (they were fruit baskets). I used one on the washing machine to hold all the laundry supplies and the other on the dryer for anything that needs to be put away – just an organized place to dump stuff!
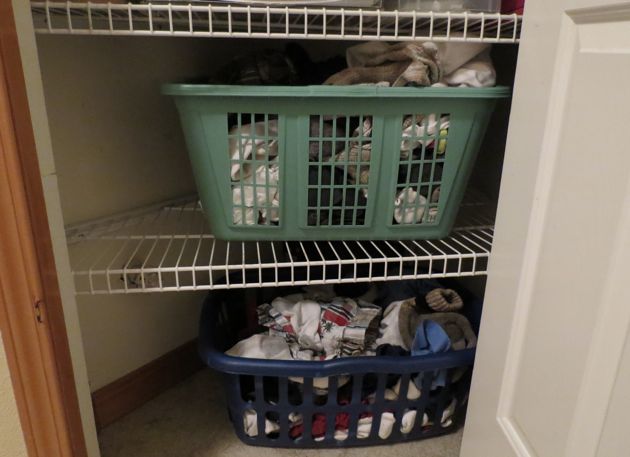
To solve the laundry basket problem I cleaned out the closet in the laundry room and used the 2 bottom shelves to store the laundry baskets so they are out of sight. No more mess all over the floor!
Craft Supplies
In our previous home we had 2 walk-in closets in our bedroom, I used one of the closets as a dedicated space to store and use my craft supplies. In this home, there was no extra space for me to call my own. The majority of my craft supplies have been in the garage in boxes and storage containers.
I finally brought the supplies into the house by finding some extra space in the laundry room to store them. It is so nice to have them handy now! Plus, I love opening the cupboard and seeing the pretty rainbow colors. Makes me happy!
Here are a few of the things I did to store some of the craft supplies:
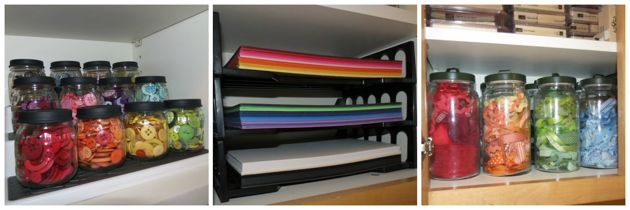
Button Jars: I used baby food jars to store the different colors of buttons. I painted the lids with chalkboard paint so they looked a little more appealing. I bought the Copco 3-Tier Cabinet Organizer![]() to store the jars at easy reach. (I just noticed an orange button is in the yellow button jar. GASP!)
to store the jars at easy reach. (I just noticed an orange button is in the yellow button jar. GASP!)
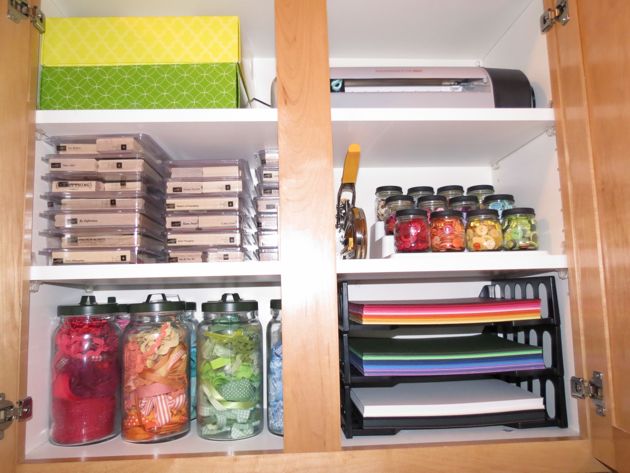
Paper Trays: I was looking for some trays to hold my cardstock, so I headed to Goodwill and got these trays for only $ .19 each. For a total of about $ .60 I had a place to store all my paper.
Ribbon Jars: I used tall jars to store my ribbon by colors. I’ve had these jars for years, I believe I bought them when I lived in Utah at Roberts Crafts.
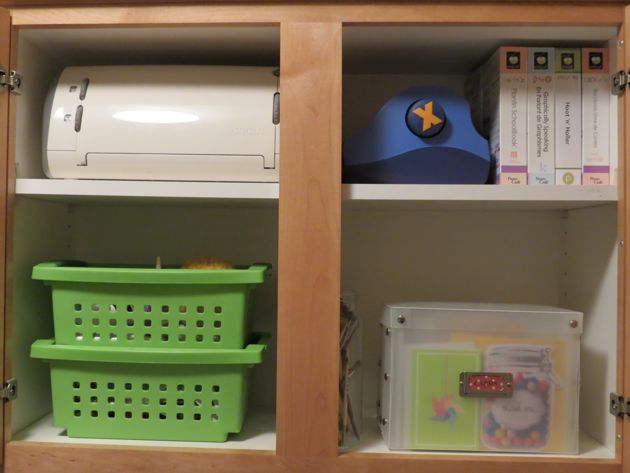
In this cupboard I used green storage containers and a card box I bought on clearance at Target for 75% off. Both of these I already had on hand. I also used some tall jars to store all my paint brushes, but you can’t really see those very well (they are behind the divider).
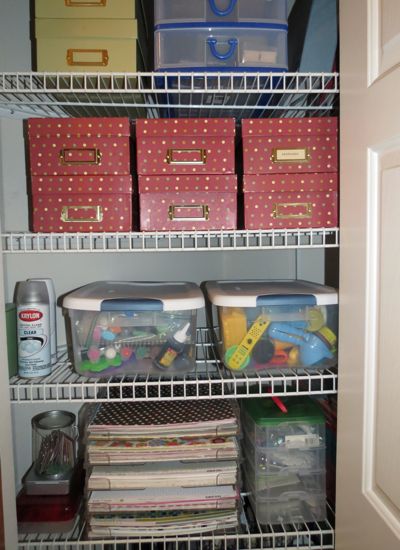
Here is the inside of the closet, with more craft storage, kids crafts, and the laundry baskets. I used old photo boxes I had from years ago as storage for supplies. The 12 x 12 Paper Trays are by Display Dynamics ![]() and I received them as a gift for my birthday years ago.
and I received them as a gift for my birthday years ago.
Storage & Organizational Center
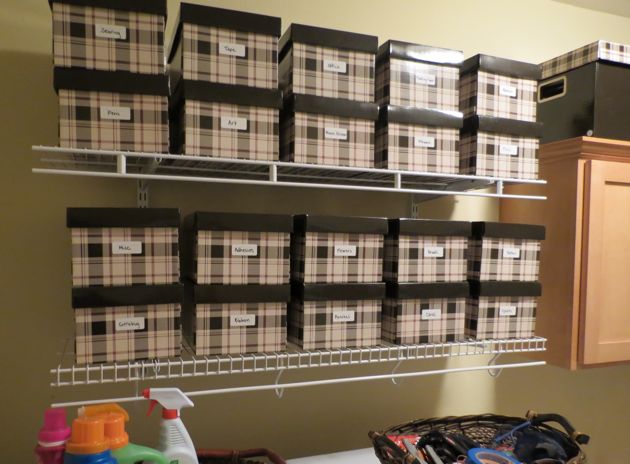
I have all of these boxes that I used to store some of my crafting supplies, but I also use some of them to store the extra school supplies. These are stored directly above my washer and dryer. I bought these about a year ago with some credits that I had, so they didn’t cost me anything.

Here is a peek inside some of the storage boxes. I buy tons of cheap school supplies in July and August to last me all year (I know many of you do the same too). It is nice to have a place where they can be accessed easily.
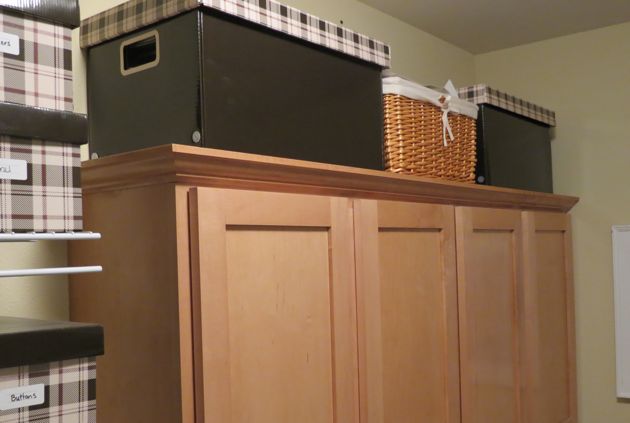
I also have a couple of larger boxes and a basket on top of the cupboards for even more storage. I store party supplies and odds and ends I don’t use on a regular basis in these boxes.

I wanted a central location that we could put all of the library books when we are done with them. I get tired of always having to search the kids rooms for the books that are due. I picked up this white wire basket at the thrift store for only $.99 (if was 50% off). I painted a wooden rectangle with chalkboard paint, drilled two small holes at the top and attached it to the top of the wire basket with jump rings. I am super pleased with how it turned out, and it was so cheap!
Oh my goodness!! I saved the best for last! This is the part of the room I am most excited about. My husband helped me build this organizational area so my kids will have a place to hang their backpacks (instead of leaving them on the floor by the front door). They also have an area above their backpacks where there can store important papers. I did not come up with this clever idea on my own, the inspiration came from The Idea Room.

Here is what it looks like with the backpacks and papers in place. I print my chore charts from Leah Remillet’s blog.

I made the clips using the arrow clothespins that I picked up at the Target Dollar Spot. I just glued some strong magnets on the back and I was good to go!
Since this post is already way longer than I thought it would be, if there is interest, I can do another post explaining how me made this, just let me know and I will see what I can do.
Now I just need to train my kids to put their backpacks away and their library books in the basket and I will be set! Make sure you check out all the Spring Cleaning posts from other Northwest Bloggers too! We tackled almost every room in the house (and outside too!)


Oh my goodness, I love what you have done here! I love that laundry room and how clever of you to add your craft supplies in there. All those colors look so pretty. I think I might have to copy your kids organizational hook/chore chart area..I love it! Great job Christy!
I love the boxes you used to store all your office supplies – do you remember where you got them?
@Sarah B. Let me do a little research and I will get back to you sometime this weekend.
Thanks! 🙂
I swear I heard a choir of angels singing when I got to the pictures of your rainbow craft supplies!!! The whole room looks amazing, and almost (ALMOST) makes me want to tackle my laundry room & craft closet!
Wow, wow!! The hooks and library book basket for the kids is just genius. And I really love the simple baskets above the washer/dryer for cleaning stuff and junk stuff. My junk drawer is overflowing in the kitchen; I’m thinking I need to move to baskets in the laundry room instead like you!
Great job! It looks fabulous & orderly and very organized so kuddos to you! The fact that you did it all on a budget is the best part! Love it & the organizational area where the kids backpacks are is my favorite! 🙂
Love your creativity of purpose matched to resources…and beauty. Lough hand clapping on my end and a few cheers! Well done and inspiring.
I would love to see another post with details on how your made the organizational/backpack area!
I love what you have done to your laundry room! You have inspired me to do something with the clutter in mine as well as given me ideas as to how to better utilize the spaces I have available in it!
Smiles ear to ear!!!! I can’t wait to tackle my laundry room now!
LOVE it! What a transformation! I love it all, but what stood out to me was the magnet board above the hooks and the library book basket! Great ideas, with four kids myself I am always struggling to keep their stuff organized. I need to come up with a plan. Thank you so much for sharing!
Awesome job! I love how organized everything is!
i love ur checkedboxes! my goodness that is an incredible idea of the door hanging names and hooks. u done a fabulous job ! laundriformation!
Nice, your so brave to take the before photo. I would die if anyone saw mine let alone post it on the internet. But, really great job!
Human beings got influenced by the preachings of the bible + marriage isnt even just about the New Testament when
the covenant is completed with Christ.
Magical! I love, love, lovity, love the kids’ wall. My laundry room too makes for a messy catch-all. I’d love to implement something like what you’ve done. Great work.
How did u attach the metal plates to the backpack wall?
We attached them with glue and then we also nailed them in place at the corner of each one.